2017年11月7日 星期二

JavaFX 3D - TriangleMesh (I)

以下是以JavaFX 8新增的TriangleMesh類別建構之物件,純以示範為主。

TriangleMesh類別以座標點與三角形的面組成3D物件,為目前大部份3D軟體所使用的方法。此外特別參考由H. M. Cundy與A. P. Rollett所著之Mathematical Models (1981) 一書,瞭解如何計算各3D物件的座標點與面,獲益良多。

其中立方體 (Cube)、正四面體 (Tetrahedron)、正八面體 (Octahedron)、正十二面體 (Dodecahedron) 與正二十面體 (Icosahedron) 均屬於Platonic Solid (柏拉圖多面體),柏拉圖多面體每面均由全等的正多邊形所組成,且每個頂點的組態一致, 為凸 (Convex) 的正多面體。

範例請參考:https://sites.google.com/site/leohkkimo/demo/javafx-3d

立方體 (Cube) 又稱為正六面體 (Hexahedron):
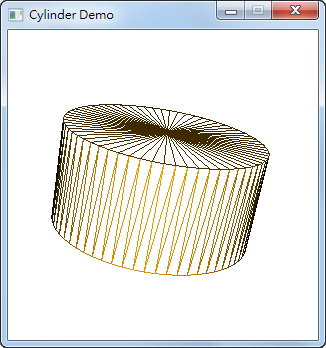
圓柱體 (Cylinder):
球體 (Sphere):
正四面體 (Tetrahedron):
正八面體 (Octahedron):
正十二面體 (Dodecahedron):
正二十面體 (Icosahedron):
【參考資料】

[1] Java Official Web Site:http://www.oracle.com/technetwork/java/index.html
[2] JavaFX:http://www.oracle.com/technetwork/java/javafx
[3] JavaFX 8.0 API Specification.
[4] Java Platform, Standard Edition 8 API Specification.

[5] JDK 8 Certified System Configurations. 
[6] H. M. Cundy, A. P. Rollett, Mathematical Models, Tarquin Publications, 1981. 
[7] G. Sellers, R. S. Wright, N. Haemel, OpenGL SuperBible: Comprehensive Tutorial and Reference (6th Edition), Addison-Wesley Professional, 2013.

© Chia-Hui Huang

JavaFX 3D - Concave Solid

在建立五角化十二面體 (Pentakis Dodecahedron) 時,不小心將座標點設錯,讓原本應該為凸 (Convex) 多面體的五角化十二面體 (Pentakis Dodecahedron),變成凹 (Concave) 多面體,不過也是一種有趣的收穫。
【參考資料】

[1] Java Official Web Site:http://www.oracle.com/technetwork/java/index.html
[2] JavaFX:http://www.oracle.com/technetwork/java/javafx
[3] JavaFX 8.0 API Specification.
[4] Java Platform, Standard Edition 8 API Specification.

[5] JDK 8 Certified System Configurations. 
[6] H. M. Cundy, A. P. Rollett, Mathematical Models, Tarquin Publications, 1981. 
[7] G. Sellers, R. S. Wright, N. Haemel, OpenGL SuperBible: Comprehensive Tutorial and Reference (6th Edition), Addison-Wesley Professional, 2013.

© Chia-Hui Huang

2017年11月6日 星期一

JavaFX 3D - PhongMaterial

JavaFX使用Phong Shading著色法,又稱為Phong Interpolation或Normal-Vector Interpolation Shading,是由美國越南裔學者Bui T??ng Phong所發明,1973年發表於博士論文 "Illumination of Computer-Generated Images", Department of Computer Science, University of Utah, UTEC-CSs-73-129, July 1973,因此以其姓氏Phong (裴)命名。 

Phong Reflection Model是由Ambient Light (環境光)、Diffuse Light (漫射光) 與Specular Light (鏡面光) 三者所組成。 

JavaFX以PhongMaterial類別處理Phong Material,並細分為Bump Map, Diffuse Map, Self Illumination Map, Specular Map, Diffuse Color, Specular Color, 與Specular Power,前四者Map用以設定貼圖、接著Color用以設定著色、最後Power用以設定強度,並定義以下屬性:
  • bumpMap: The bump map of this PhongMaterial, which is a normal map stored as a RGB Image.
  • diffuseColor: The diffuse color of this PhongMaterial.
  • diffuseMap: The diffuse map of this PhongMaterial.
  • selfIlluminationMap: The self illumination map of this PhongMaterial.
  • specularColor: The specular color of this PhongMaterial.
  • specularMap: The specular map of this PhongMaterial.
  • specularPower: The specular power of this PhongMateria.
請參考以下範例分別示範以各種不同的組合所產生的效果:
// 建立Sphere物件
Sphere sphere = new Sphere(200); 
sphere.setTranslateX(200); 
sphere.setTranslateY(200); 

// 建立PhongMaterial物件
PhongMaterial material = new PhongMaterial(); 
// 設定Bump Map貼圖
material.setBumpMap(new Image(getClass().getResourceAsStream(  
  "images/earth_normal_map.jpg"), 512, 256, true, true)); 

sphere.setMaterial(material); 
...
【執行結果】

// 建立Sphere物件
Sphere sphere = new Sphere(200); 
sphere.setTranslateX(200); 
sphere.setTranslateY(200); 

// 建立PhongMaterial物件
PhongMaterial material = new PhongMaterial(); 
// 設定Diffuse Map貼圖
material.setDiffuseMap(new Image(getClass().getResourceAsStream(
  "images/earth_diffuse_map.jpg"), 512, 256, true, true)); 

sphere.setMaterial(material); 
...
【執行結果】

// 建立Sphere物件
Sphere sphere = new Sphere(200); 
sphere.setTranslateX(200); 
sphere.setTranslateY(200); 

// 建立PhongMaterial物件
PhongMaterial material = new PhongMaterial(); 
// 設定Specular Map貼圖
material.setSpecularMap(new Image(getClass().getResourceAsStream(
  "images/earth_specular_map.jpg"), 512, 256, true, true));

sphere.setMaterial(material); 
...

【執行結果】
以下為同時設定三種貼圖,產生立體的效果:
// 建立Sphere物件
Sphere sphere = new Sphere(200); 
sphere.setTranslateX(200); 
sphere.setTranslateY(200); 

// 建立PhongMaterial物件
PhongMaterial material = new PhongMaterial(); 
// 設定Bump Map貼圖
material.setBumpMap(new Image(getClass().getResourceAsStream(  
  "images/earth_normal_map.jpg"), 512, 256, true, true)); 
// 設定Diffuse Map貼圖
material.setDiffuseMap(new Image(getClass().getResourceAsStream(
  "images/earth_diffuse_map.jpg"), 512, 256, true, true)); 
// 設定Specular Map貼圖
material.setSpecularMap(new Image(getClass().getResourceAsStream(
  "images/earth_specular_map.jpg"), 512, 256, true, true));

sphere.setMaterial(material); 
...
【執行結果】
以下示範設定著色的效果:
// 建立Sphere物件
Sphere sphere = new Sphere(200); 
// 以填滿方式呈現
sphere.setDrawMode(DrawMode.FILL); 
// 省略背面
sphere.setCullFace(CullFace.BACK); 
sphere.setTranslateX(200); 
sphere.setTranslateY(200); 

// 建立PhongMaterial物件
PhongMaterial material = new PhongMaterial(); 
// 設定Diffuse Color
material.setDiffuseColor(Color.AQUA);

sphere.setMaterial(material); 
...
【執行結果】
// 建立Sphere物件
Sphere sphere = new Sphere(200); 
// 以填滿方式呈現
sphere.setDrawMode(DrawMode.FILL); 
// 省略背面
sphere.setCullFace(CullFace.BACK); 
sphere.setTranslateX(200); 
sphere.setTranslateY(200); 

// 建立PhongMaterial物件
PhongMaterial material = new PhongMaterial(); 
// 設定Specular Color
material.setSpecularColor(Color.AQUA);

sphere.setMaterial(material); 
...
【執行結果】
以下為同時設定兩種著色的效果:
// 建立Sphere物件
Sphere sphere = new Sphere(200); 
// 以填滿方式呈現
sphere.setDrawMode(DrawMode.FILL); 
// 省略背面
sphere.setCullFace(CullFace.BACK); 
sphere.setTranslateX(200); 
sphere.setTranslateY(200); 

// 建立PhongMaterial物件
PhongMaterial material = new PhongMaterial(); 
// 設定Diffuse Color
material.setDiffuseColor(Color.AQUA);
// 設定Specular Color
material.setSpecularColor(Color.AQUA);

sphere.setMaterial(material); 
...
【執行結果】
最後是同時設定以上五種效果:
// 建立Sphere物件
Sphere sphere = new Sphere(200); 
// 以填滿方式呈現
sphere.setDrawMode(DrawMode.FILL); 
// 省略背面
sphere.setCullFace(CullFace.BACK); 
sphere.setTranslateX(200); 
sphere.setTranslateY(200); 

// 建立PhongMaterial物件
PhongMaterial material = new PhongMaterial(); 
// 設定Bump Map貼圖
material.setBumpMap(new Image(getClass().getResourceAsStream(  
  "images/earth_normal_map.jpg"), 512, 256, true, true)); 
// 設定Diffuse Map貼圖
material.setDiffuseMap(new Image(getClass().getResourceAsStream( 
  "images/earth_diffuse_map.jpg"), 512, 256, true, true)); 
// 設定Specular Map貼圖
material.setSpecularMap(new Image(getClass().getResourceAsStream(
  "images/earth_specular_map.jpg"), 512, 256, true, true));
// 設定Diffuse Color
material.setDiffuseColor(Color.AQUA);
// 設定Specular Color
material.setSpecularColor(Color.AQUA);

sphere.setMaterial(material); 
...
【執行結果】
【參考資料】

[1] 黃嘉輝,深入研究JavaFX 2。
[2] 黃嘉輝,JavaFX遊戲程式設計。
[3] Java Official Web Site:http://www.oracle.com/technetwork/java/index.html
[4] JavaFX:http://www.oracle.com/technetwork/java/javafx
[5] JavaFX 8.0 API Specification.
[6] Java Platform, Standard Edition 8 API Specification.
[7] JDK 8 Certified System Configurations

© Chia-Hui Huang

JavaFX 3D - Earth

以JavaFX的Sphere類別繪製球體,再以PhongMaterial類別分別設定Bump Map, Diffuse Map與Specular Map貼圖,產生立體效果的地球。

【執行結果】
【參考資料】

[1] 黃嘉輝,深入研究JavaFX 2。
[2] 黃嘉輝,JavaFX遊戲程式設計。
[3] Java Official Web Site:http://www.oracle.com/technetwork/java/index.html
[4] JavaFX:http://www.oracle.com/technetwork/java/javafx
[5] JavaFX 8.0 API Specification.
[6] Java Platform, Standard Edition 8 API Specification.
[7] JDK 8 Certified System Configurations

© Chia-Hui Huang

JavaFX 3D - Sphere

繼上一篇JavaFX 3D - Cylinder,本篇將介紹Sphere類別。

Sphere類別用以建立球體,其建構函式如下,以radius參數設定球體的半徑,此外divisions參數設定球體的分割等分,以產生不同類型的立體,請參考後續範例:

  public Sphere()
  public Sphere(double radius) 
  public Sphere(double radius, int divisions) 

並提供以下方法:
  • getRadius():取得球體的半徑。
  • setRadius():設定球體的半徑。
  • getDivisions():取得球體的分割等分。
請參考以下範例分別示範以setCullFace()與setDrawMode()方法不同的組合所產生的效果:
// 建立Sphere物件
Sphere sphere = new Sphere(100); 
// 以Wireframe方式呈現
sphere.setDrawMode(DrawMode.LINE); 
// 不省略
sphere.setCullFace(CullFace.NONE); 
// 平移Sphere物件
sphere.setLayoutX(150); 
sphere.setLayoutY(150); 
// 旋轉Sphere物件
sphere.getTransforms().add(new Rotate(20,Rotate.X_AXIS));
sphere.getTransforms().add(new Rotate(10,Rotate.Z_AXIS));
sphere.getTransforms().add(new Rotate(30,Rotate.Y_AXIS)); 

Group root = new Group(); 
root.getChildren().add(sphere);
...
【執行結果】
// 建立Sphere物件
Sphere sphere = new Sphere(100, 100); 
// 以Wireframe方式呈現
sphere.setDrawMode(DrawMode.LINE); 
// 省略Back Face
sphere.setCullFace(CullFace.BACK); 
...
【執行結果】
// 建立Sphere物件
Sphere sphere = new Sphere(100, 100); 
// 以Wireframe方式呈現
sphere.setDrawMode(DrawMode.LINE); 
// 省略Front Face
sphere.setCullFace(CullFace.FRONT); 
...
【執行結果】
// 建立Sphere物件
Sphere sphere = new Sphere(100, 100); 
// 以填滿方式呈現
sphere.setDrawMode(DrawMode.FILL); 
// 省略Back Face
sphere.setCullFace(CullFace.BACK); 
...
【執行結果】
以下範例示範setMaterial()方法設定貼圖:
// 建立Sphere物件
Sphere sphere = new Sphere(100);  
// 以填滿方式呈現
sphere.setDrawMode(DrawMode.FILL); 

Image image = new Image(
  getClass().getResourceAsStream("images/earthmap.jpg"));

// 設定材質
PhongMaterial material = new PhongMaterial(); 
// 設定貼圖
material.setDiffuseMap(image);

// 設定物件表面的材質
sphere.setMaterial(material);

Group root = new Group(); 
root.getChildren().add(box);
...
【執行結果】
divisions參數用以設定球體的分割等分,以下是以Sphere建構函式設定球體的分割等分:
// 建立Sphere物件
Sphere sphere = new Sphere(100, 8);

Image image = new Image(  
  getClass().getResourceAsStream("images/Javafx.png")); 

// 設定材質
PhongMaterial material = new PhongMaterial(); 
// 設定貼圖
material.setDiffuseMap(image);
...
【執行結果】
【參考資料】

[1] 黃嘉輝,深入研究JavaFX 2。
[2] 黃嘉輝,JavaFX遊戲程式設計。
[3] Java Official Web Site:http://www.oracle.com/technetwork/java/index.html
[4] JavaFX:http://www.oracle.com/technetwork/java/javafx
[5] JavaFX 8.0 API Specification.
[6] Java Platform, Standard Edition 8 API Specification.
[7] JDK 8 Certified System Configurations

[8] H. M. Cundy, A. P. Rollett, Mathematical Models, Tarquin Publications, 1981.
[9] G. Sellers, R. S. Wright, N. Haemel, OpenGL SuperBible: Comprehensive Tutorial and Reference (6th Edition), Addison-Wesley Professional, 2013.

© Chia-Hui Huang

JavaFX 3D - Cylinder

繼上一篇JavaFX 3D - Box,本篇將介紹Cylinder類別。

Cylinder類別用以建立圓柱體,其建構函式如下,分別由height與radius參數設定圓柱體的高度與半徑,此外divisions參數設定圓柱體的分割等分,以產生不同類型的立方柱體,請參考後續範例:

  public Cylinder()
  public Cylinder(double radius, double height) 
  public Cylinder(double radius, double height, int divisions) 

並提供以下方法:
  • getHeight():取得圓柱體的高度。
  • setHeight():設定圓柱體的高度。
  • getRadius():取得圓柱體的半徑。
  • setRadius():設定圓柱體的半徑。
  • getDivisions():取得圓柱體的分割等分。
請參考以下範例分別示範以setCullFace()與setDrawMode()方法不同的組合所產生的效果:
// 建立Cylinder物件
Cylinder cylinder = new Cylinder(100, 100); 
// 以Wireframe方式呈現
cylinder.setDrawMode(DrawMode.LINE); 
// 不省略
cylinder.setCullFace(CullFace.NONE); 
// 平移Cylinder物件
cylinder.setLayoutX(150); 
cylinder.setLayoutY(150); 
// 旋轉Cylinder物件
cylinder.getTransforms().add(new Rotate(20,Rotate.X_AXIS));
cylinder.getTransforms().add(new Rotate(10,Rotate.Z_AXIS));
cylinder.getTransforms().add(new Rotate(30,Rotate.Y_AXIS)); 

Group root = new Group(); 
root.getChildren().add(cylinder);
...
【執行結果】
// 建立Cylinder物件
Cylinder cylinder = new Cylinder(100, 100); 
// 以Wireframe方式呈現
cylinder.setDrawMode(DrawMode.LINE); 
// 省略Back Face
cylinder.setCullFace(CullFace.BACK); 
...
【執行結果】
// 建立Cylinder物件
Cylinder cylinder = new Cylinder(100, 100); 
// 以Wireframe方式呈現
cylinder.setDrawMode(DrawMode.LINE); 
// 省略Front Face
cylinder.setCullFace(CullFace.FRONT); 
...
【執行結果】
// 建立Cylinder物件
Cylinder cylinder = new Cylinder(100, 100); 
// 以填滿方式呈現
cylinder.setDrawMode(DrawMode.FILL); 
// 省略Back Face
cylinder.setCullFace(CullFace.BACK); 
...
【執行結果】
// 建立Cylinder物件
Cylinder cylinder = new Cylinder(100, 100); 
// 以填滿方式呈現
cylinder.setDrawMode(DrawMode.FILL); 
// 省略Front Face
cylinder.setCullFace(CullFace.FRONT);
...
【執行結果】
以下範例示範setMaterial()方法設定貼圖:
// 建立Cylinder物件
Cylinder cylinder = new Cylinder(100, 100); 

Image image = new Image(  
  getClass().getResourceAsStream("images/Javafx.png")); 

// 設定材質
PhongMaterial material = new PhongMaterial(); 
// 設定貼圖
material.setDiffuseMap(image);
...
【執行結果】
divisions參數用以設定圓柱體的分割等分,以下是以Cylinder建構函式設定圓柱體的切割為八角柱體 (Octagonal Prism):
// 建立Cylinder物件
Cylinder cylinder = new Cylinder(100, 100, 8); 

Image image = new Image(  
  getClass().getResourceAsStream("images/Javafx.png")); 

// 設定材質
PhongMaterial material = new PhongMaterial(); 
// 設定貼圖
material.setDiffuseMap(image);
...
【執行結果】
此外,可加入滑鼠事件,當滑鼠移動時 (Mouse Moved),藉由Rotate類別旋轉物件:
scene.setOnMouseMoved((MouseEvent e) -> {
  newX = e.getX(); 
  if (Math.abs(newX - oldX) > 5) { 
    cylinder.getTransforms().add(
      new Rotate(newX - oldX, Rotate.X_AXIS)); 
    oldX = newX; 
  } 

  newY = e.getY(); 
  if (Math.abs(newY - oldY) > 5) { 
    cylinder.getTransforms().add(
      new Rotate(newY - oldY, Rotate.Y_AXIS)); 
    oldY = newY; 
  } 
});
...
亦可試著以Timeline類別設定時間軸,以產生動畫效果:
final Timeline timeline = new Timeline(
  new KeyFrame(Duration.millis(50), new EventHandler() { 

  double deltaX = 20.0, deltaY = 30.0, deltaZ = 10.0; 

  @Override public void handle(final ActionEvent e) { 
    cylinder.getTransforms().add(new Rotate(deltaX, Rotate.X_AXIS)); 
    deltaX += 10; 
    cylinder.getTransforms().add(new Rotate(deltaY, Rotate.Y_AXIS)); 
    deltaY += 10; 
    cylinder.getTransforms().add(new Rotate(deltaZ, Rotate.Z_AXIS)); 
    deltaZ += 10; 
  } 
})); 

timeline.setCycleCount(Timeline.INDEFINITE); 
timeline.play();
...
【參考資料】

[1] 黃嘉輝,深入研究JavaFX 2。
[2] 黃嘉輝,JavaFX遊戲程式設計。
[3] Java Official Web Site:http://www.oracle.com/technetwork/java/index.html
[4] JavaFX:http://www.oracle.com/technetwork/java/javafx
[5] JavaFX 8.0 API Specification.
[6] Java Platform, Standard Edition 8 API Specification.
[7] JDK 8 Certified System Configurations.
[8] H. M. Cundy, A. P. Rollett, Mathematical Models, Tarquin Publications, 1981.
[9] G. Sellers, R. S. Wright, N. Haemel, OpenGL SuperBible: Comprehensive Tutorial and Reference (6th Edition), Addison-Wesley Professional, 2013.

© Chia-Hui Huang

JavaFX 3D - Box

繼上一篇JavaFX 3D System Requirements,本篇將介紹Box類別。

JavaFX 8新增Shape3D抽象類別,繼承自Shape3D抽象類別的3D物件包括Box, Cylinder, MeshView, Sphere等,Shape3D抽象類別定義以下屬性:
  • cullFace:沿用自OpenGL的GL_CULL_FACE。多邊體 (Polygon) 是由數個面 (Facet) 所組成,每一個面由數個頂點 (Vertex) 所設定,在描繪3D物件時,面對鏡頭的一面稱為Front Face,背對鏡頭的一面稱為Back Face,由於描繪3D物件需要複雜的計算,因此為增加執行效率,通常會省略描繪背對鏡頭的一面,此功能稱為Cull Face。在OpenGL中,以glCullFace()方法設定省略描繪Front Face或Back Face,欲啟用Cull Face功能,則以glEnable(GL_CULL_FACE)方法設定。JavaFX 8的Shape3D抽象類別沿用OpenGL此一功能,以cullFace屬性設定是否省略描繪Front Face或Back Face,分別為CullFace.FRONT、CullFace.BACK或CullFace.NONE,代表省略描繪Front Face、Back Face或不省略。
  • drawMode:定義3D物件的繪製方式,分別為DrawMode.FILL或DrawMode.LINE,代表填滿3D物件表面或以Wireframe方式呈現。
  • material:定義3D物件表面的材質。
Shape3D抽象類別提供以下方法:
  • getCullFace():取得省略描繪的一面,回傳CullFace.FRONT、CullFace.BACK或CullFace.NONE,代表省略描繪Front Face、Back Face或不省略。
  • setCullFace():設定省略描繪的一面,預設為CullFace.BACK。
  • getDrawMode():取得3D物件的繪製方式,回傳DrawMode.FILL或DrawMode.LINE,代表填滿3D物件表面或以Wireframe方式呈現。
  • setDrawMode():設定3D物件的繪製方式,預設為DrawMode.FILL。
  • getMaterial():取得3D物件表面的材質。
  • setMaterial():設定3D物件表面的材質。
Box類別用以建立3D方塊,其建構函式如下,分別由width、height與depth設定寬度、高度與深度:

  public Box()
  public Box(double width, double height, double depth)

並提供以下方法:
  • getDepth():取得方塊的深度。
  • setDepth():設定方塊的深度。
  • getHeight():取得方塊的高度。
  • setHeight():設定方塊的高度。
  • getWidth():取得方塊的寬度。
  • setWidth():設定方塊的寬度。
請參考以下範例分別示範以setCullFace()與setDrawMode()方法不同的組合所產生的效果:
// 建立Box物件
Box box = new Box(100, 100, 100); 
// 以Wireframe方式呈現
box.setDrawMode(DrawMode.LINE); 
// 不省略
box.setCullFace(CullFace.NONE); 
// 平移Box物件
box.setLayoutX(150);
box.setLayoutY(150); 
// 旋轉Box物件
box.getTransforms().add(new Rotate(30,Rotate.X_AXIS));
box.getTransforms().add(new Rotate(30,Rotate.Y_AXIS));
box.getTransforms().add(new Rotate(30,Rotate.Z_AXIS)); 

Group root = new Group(); 
root.getChildren().add(box);
...
【執行結果】
// 建立Box物件
Box box = new Box(100, 100, 100); 
// 以Wireframe方式呈現
box.setDrawMode(DrawMode.LINE); 
// 省略Back Face
box.setCullFace(CullFace.BACK); 
...
【執行結果】
// 建立Box物件
Box box = new Box(100, 100, 100); 
// 以Wireframe方式呈現
box.setDrawMode(DrawMode.LINE); 
// 省略Front Face
box.setCullFace(CullFace.FRONT); 
...
【執行結果】
// 建立Box物件
Box box = new Box(100, 100, 100); 
// 以填滿方式呈現
box.setDrawMode(DrawMode.FILL); 
// 省略Back Face
box.setCullFace(CullFace.BACK); 
...
【執行結果】
// 建立Box物件
Box box = new Box(100, 100, 100); 
// 以填滿方式呈現
box.setDrawMode(DrawMode.FILL); 
// 省略Front Face
box.setCullFace(CullFace.FRONT); 
...
【執行結果】
以下範例示範setMaterial()方法設定物件表面的材質,其中以PhongMaterial類別設定材質的相關顏色 (註):
// 建立Box物件
Box box = new Box(100, 100, 100); 
// 以填滿方式呈現
box.setDrawMode(DrawMode.FILL); 
// 設定材質
PhongMaterial material = new PhongMaterial(); 
// Diffuse Color 
material.setDiffuseColor(Color.YELLOW); 
// Specular Color 
material.setSpecularColor(Color.WHITE); 
// 設定物件表面的材質
box.setMaterial(material);
// 平移Box物件
box.setLayoutX(150);
box.setLayoutY(150); 
// 旋轉Box物件
box.getTransforms().add(new Rotate(30,Rotate.X_AXIS));
box.getTransforms().add(new Rotate(30,Rotate.Y_AXIS));
box.getTransforms().add(new Rotate(30,Rotate.Z_AXIS)); 

Group root = new Group(); 
root.getChildren().add(box);
...
【執行結果】
以下範例示範setMaterial()方法設定貼圖:
// 建立Box物件
Box box = new Box(100, 100, 100); 

Image image = new Image(  
  getClass().getResourceAsStream("images/Javafx.png")); 

// 設定材質
PhongMaterial material = new PhongMaterial(); 
// 設定貼圖
material.setDiffuseMap(image);
...
【執行結果】
此外,可加入滑鼠事件,當滑鼠移動時 (Mouse Moved),藉由Rotate類別旋轉物件:
scene.setOnMouseMoved((MouseEvent e) -> {
  newX = e.getX(); 
  if (Math.abs(newX - oldX) > 5) { 
    box.getTransforms().add(new Rotate(newX - oldX, Rotate.X_AXIS)); 
    oldX = newX; 
  } 

  newY = e.getY(); 
  if (Math.abs(newY - oldY) > 5) { 
    box.getTransforms().add(new Rotate(newY - oldY, Rotate.Y_AXIS)); 
    oldY = newY; 
  } 
});
...
【執行結果】
亦可試著以Timeline類別設定時間軸,以產生動畫效果:
final Timeline timeline = new Timeline(
  new KeyFrame(Duration.millis(50), new EventHandler() { 

  double deltaX = 20.0, deltaY = 30.0, deltaZ = 10.0; 

  @Override public void handle(final ActionEvent e) {  
    box.getTransforms().add(new Rotate(deltaX, Rotate.X_AXIS)); 
    deltaX += 10; 
    box.getTransforms().add(new Rotate(deltaY, Rotate.Y_AXIS)); 
    deltaY += 10; 
    box.getTransforms().add(new Rotate(deltaZ, Rotate.Z_AXIS)); 
    deltaZ += 10; 
  } 
})); 

timeline.setCycleCount(Timeline.INDEFINITE); 
timeline.play();
...
(註):

JavaFX使用Phong Shading著色法,又稱為Phong Interpolation或Normal-Vector Interpolation Shading,是由美國越南裔學者Bui T??ng Phong所發明,1973年發表於博士論文 "Illumination of Computer-Generated Images", Department of Computer Science, University of Utah, UTEC-CSs-73-129, July 1973,因此以其姓氏Phong (裴)命名。 

Phong Reflection Model是由Ambient Light (環境光)、Diffuse Light (漫射光) 與Specular Light (鏡面光) 三者所組成。 

JavaFX的Phong Material細分為Bump Map, Diffuse Map, Self Illumination Map, Specular Map, Diffuse Color, Specular Color, 與Specular Power,前四者Map用以設定貼圖、接著Color用以設定著色、最後Power用以設定強度。

【參考資料】

[1] 黃嘉輝,深入研究JavaFX 2。
[2] 黃嘉輝,JavaFX遊戲程式設計。
[3] Java Official Web Site:http://www.oracle.com/technetwork/java/index.html
[4] JavaFX:http://www.oracle.com/technetwork/java/javafx
[5] JavaFX 8.0 API Specification.
[6] Java Platform, Standard Edition 8 API Specification.
[7] JDK 8 Certified System Configurations
[8] H. M. Cundy, A. P. Rollett, Mathematical Models, Tarquin Publications, 1981.
[9] G. Sellers, R. S. Wright, N. Haemel, OpenGL SuperBible: Comprehensive Tutorial and Reference (6th Edition), Addison-Wesley Professional, 2013.

© Chia-Hui Huang

JavaFX 3D - System Requirements

JavaFX 8新增3D功能,與之前JavaFX 2的模擬3D不大一樣,例如新增Shape3D抽象類別,繼承自Shape3D抽象類別的3D物件包括Box, Cylinder, MeshView, Sphere等類別,均為真正的3D物件。

欲執行JavaFX 3D,首先作業系統與瀏覽器須符合JDK 8 Certified System Configurations,可參考此連結,須注意的是JavaFX 8已不支援Windows XP作業系統,若是Windows 7則需SP1以上,此外,系統顯示卡的驅動程式可能也需要更新方可正常執行。

為判斷系統是否支援JavaFX 3D,可使用Platform.isSupported()方法判斷,其參數為ConditionalFeature.SCENE3D,請參考以下程式:
// 判斷系統是否支援JavaFX 3D
if (Platform.isSupported(ConditionalFeature.SCENE3D)) {
  PhongMaterial phongmaterial = new PhongMaterial();
  phongmaterial.setSpecularColor(Color.ORANGE);
  phongmaterial.setDiffuseColor(Color.RED);

  Box box = new Box(400, 400, 400);
  box.setMaterial(phongmaterial);

  Group group = new Group();
  group.getChildren().add(box);

  Scene scene = new Scene(group, 500, 500);

  primaryStage.setTitle("Box 3D");
  primaryStage.setScene(scene);
  primaryStage.show();
}
else {
  System.out.println("System can't support Scene 3D.");
  System.exit(0);
}
【參考資料】

[1] 黃嘉輝,深入研究JavaFX 2。
[2] 黃嘉輝,JavaFX遊戲程式設計。
[3] Java Official Web Site:http://www.oracle.com/technetwork/java/index.html
[4] JavaFX:http://www.oracle.com/technetwork/java/javafx
[5] JavaFX 8.0 API Specification.
[6] Java Platform, Standard Edition 8 API Specification.
[7] JDK 8 Certified System Configurations

© Chia-Hui Huang